How to Make Money from Mastering. Music Studio Advice
November 10, 2020
How to Record Upright Piano
December 28, 2020How to mix kick and bass in hip hop
Mixing bass and kick in hip hop is not as difficult as it sounds but you have to get the foundations right to make both parts sound right
So how to mix bass and kick in hip hop? Apply a high pass filter above 20hz to both kick and bass. Then, find the frequency of each element and write it down. In bass track apply cut eq at the kick frequency, in the kick track apply cut eq at bass frequency. This will form a puzzle type eq where each element complements each other and make space in the mix. Then use a compressor on each of the tracks.
This might sounds simple and not enough to get the nice and clean mix so let me talk you through the process.
Plugins
We’ll be using only 2 plugins:
- EQ
- Compressor
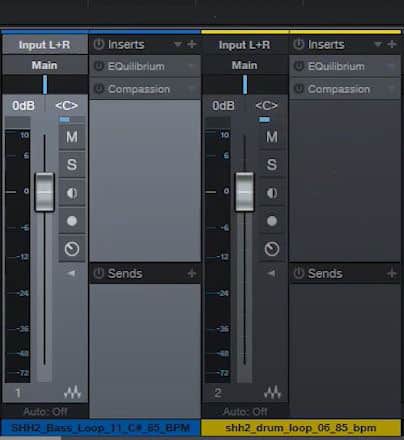
Both EQ and compressor will be added to each track, so bass track gets EQ and compressor and the kick track gets separate compressor.
Make sure you insert EQ before the compressor for both tracks just like in the picture below. EQualibrium is my EQ plugin and Compassion is my compressor plugin.
You can use any plugin you like. At the end of this article I recommend some of my favorite plugins so make sure you check them out.
How to EQ bass
Lets start with the bass first and let’s solo it so we could only hear the bass.
If you don’t know how to solo the track press “S” on your keyboard (while the bass track is selected) or look for the “S” symbol next to your channel settings. You might also find it next to the track name in your sequencer.
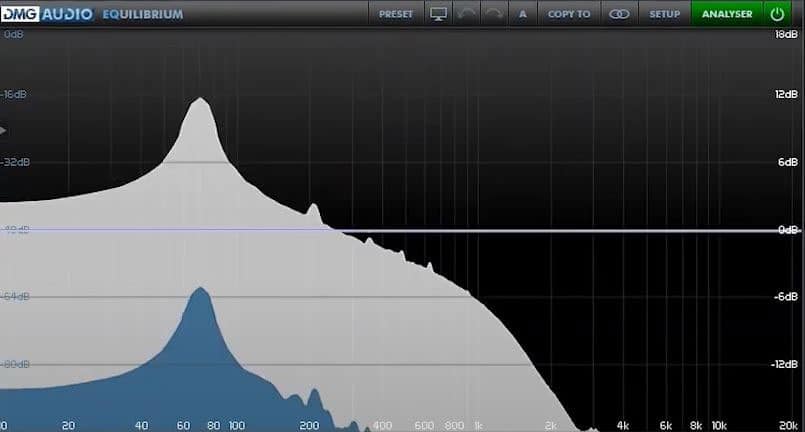
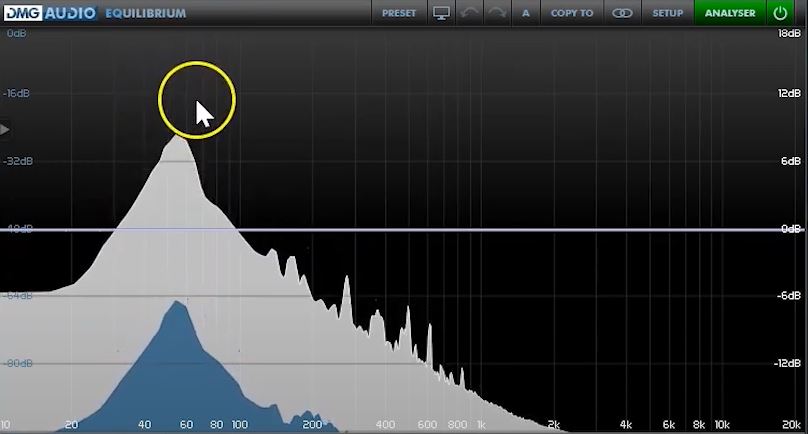
Once the bass track is solo’ed, open up your EQ plugin. If you’re lucky your plugin will have Analyzer option. Analyzer basically lets you see the frequencies of your track. It’s a very handy tool to have especially during the processes we’ll do now.
This is how the Analyzer would look like :
EQ bass - high pass filter
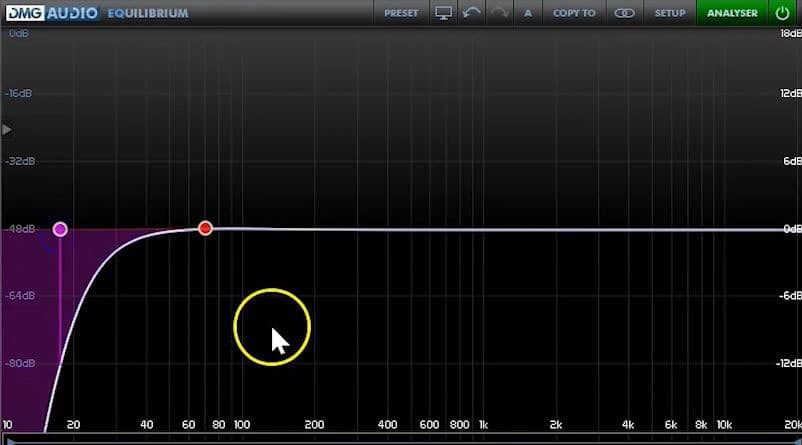
The very first thing we have to do is to apply the high pass filter to the bass track using our EQ. This will get rid of the unwanted frequencies from our bass track and clean up our low end frequency spectrum for us.
To do this, create a new point on your EQ, set it to 20hz with a steep curve just like in the picture below.
EQ bass - finding bass frequency
Once we applied our high pass filter it’s time to find out what is the actual frequency of our bass. This is the frequency where our bass track is most prominent. To do this, we’ll use Analyzer.
Play your bass track and watch the Analyzer waves.
Identify the highest points in the scale and write it down (just like in the picture below). This is all we’re going to do with the bass just now. Let’s move on to the kick.
How to EQ kick
EQ process of the kick track is the same as the bass. Follow those steps just like in the bass section :
- Apply high pass filter at 20hz
- Using Analyzer find and write down the frequency for the kick
EQ bass and kick together
At this stage you should have two EQ’s with high pass filter and the frequencies of both bass and kick (just like in the picture below)

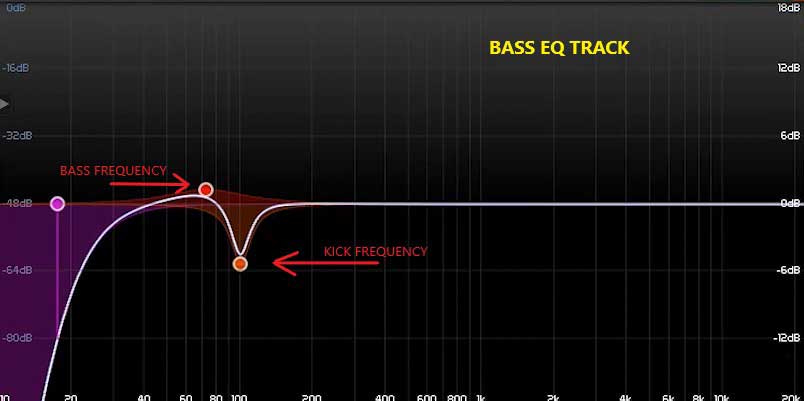
Now you have to go to your bass EQ and cut out the kick frequency (the one you’ve written down). So basically you’re making space for the kick in the bass track. At the same time you want to boost your bass frequency a bit in the same EQ (bass EQ) to give the bass a little lift
For example, if your kick frequency is a 100hz you should go to your bass EQ and make a dip at 100hz and boost your bass frequency at 70hz (just like the in the picture below).
Now we’re going to do the same thing with the kick track but other way round – cutting bass frequency and boosting kick frequency.
So pull out your kick EQ and cut out the bass frequency (the one you boosted in the bass EQ) and boost kick frequency (the one you cut out in the bass EQ). Both of your EQ’s should look like this:
As you can see we created something like a puzzle where each EQ makes a “room” for each other.
This is the technique where bass makes a space in the mix for the kick and kick does the same for the bass.
By using this puzzle technique your low end won’t sound muddy but tight and balance.
Let’s move to compressions next.
Remember, when setting up a compressor make sure you jump between the setting and adjust them to the sound you want. Jump from attack, to threshold to makeup and back to get the best out of the compression process.
How to compress bass
Bass really like to be compressed and sounds best when compressed properly. So don’t be shy when using compressor on the bass.
Remember, each bass will need a bit different settings depending on the groove of the whole track, the tempo and so on. The setting I’ll show you should be a good starting point in getting the best sound out of your bassline.
These are the setting I would use as a starting point for the bassline :
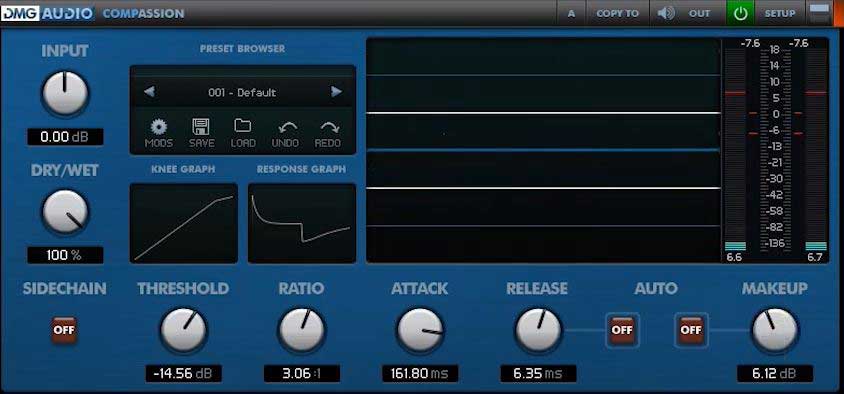
Ratio – set ratio at around 3:1. That way compressor will work pretty hard but not too hard to ruin the sound.
Attack – in hip hop you’re looking at slow attack time. That way the bass will be punchy.
Release – you want to set release time somewhere half way down the scale. By doing this you indicate how fast the sound will come back from the compressor.
Take some time with your release time. This is where you can shape the tone of the bass.
Threshold – you have to experiment with the threshold until you it takes enough of the signal that you’re loosing a bit of the volume (don’t worry, we’ll fix the volume in the next step).
Makeup – makeup is adding volume to the sound and basically is making up of all the volume lose you’re loosing with the threshold. You’ll lose volume with threshold but gain it back with the makeup.
How to compress kick
Compressing kick drum is slightly different than the bass. Kick doesn’t need that much compression and when overdone can actually destroy the dynamics and punchyness.
These are the setting I would use as a starting point for the kick:
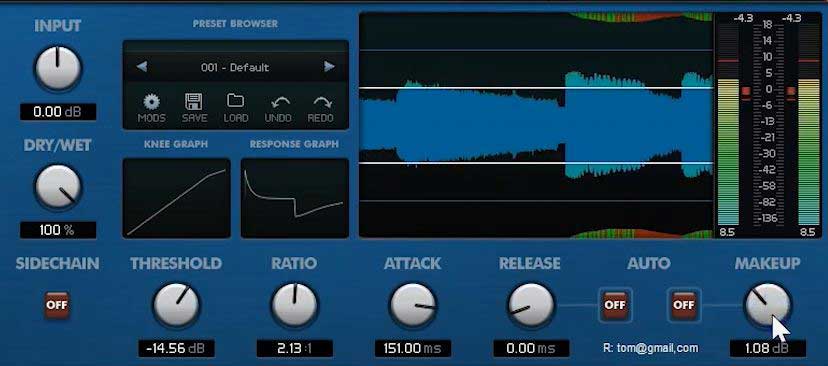
Ratio – set ratio at 2:1 so the compressor gets enough signal but not too much to destroy the punch of the kick.
Attack – you should set slow attack for the kick. You don’t want the compressor to start affecting the kick too early.
Release – set release to fast, somewhere around 0 ms. This way the kick will get the nice and punchy sound.
Threshold – same as before – experiment. Threshold setting depend on the type of the kick drum, volume etc. but apply enough threshold so the volume gets a bit lost (and so you can get it back with the next step, Makeup).
Makeup – here you have to make up all the volume lost with the threshold. Whatever you lost in the previous step, get back with the makeup gain.
Compering bass and kick and adjusting
Once you done with the settings play both of the track together and go back to the compressors to adjust some of the settings. Attack and release will give you the most audible changes and the “vibe” of bass and kick together.
Remember, experiment 🙂
Above settings will give you nice foundation to get that low end set and cleared out. You’ll now want to start adding other elements to your mix like vocals, keys etc but you don’t have to worry about the bass and kick anymore.
Hope that helps!
Tom
I’m Tom S. Ray and I’m head mastering engineer at Audio Unity Group. I also hold a bachelor with honours degree in music from Kingston University in London, I lecture mastering to students in Edinburgh College and to my online students via my Mastering Mastery audio mastering online course.
